Spring Cards

Cut and glue, and cut and glue again. The yellow flower is ... a vanilla flower. Really?!

She wants to give them to her teachers at Kindergarten, to a friend ...


Tag Your Food
I made some spring cards. My 5 years daughter wanted to make some too. OK, I said: scissors, glue, punch, card stock and ... her little hands.

Cut and glue, and cut and glue again. The yellow flower is ... a vanilla flower. Really?!

She wants to give them to her teachers at Kindergarten, to a friend ...


Tag Your Food
Everytime I go to a party or potluck, people ask me all the time what kind of food I cooked, with what and where did I buy from. So, this time I decided to tag my food. I cooked a simple potatoes salad. And I made some tags from card stock - butterflies. I wrote the food name and the ingredients. This idea can be helpful for you and for the others, because maybe somebody is allergic to some ingredients. In this way you notify what kind of food you cooked. And it is fun too! But there are the steps:
Materials: card stock, glue, toothpicks, shiny paper, punch
Steps:
1. Cut some shapes from card stock. I chose to make butterflies. I cut 2 butterflies from each color.

2. Stick together the butterflies with the toothpick in the middle. Write your food name and the ingredients. On the other side you can write short messages: Enjoy, Good appetite, Hello, Welcome or everything else related to the food, to the party...

3. You can decorate the butterflies with punched shapes: I punched from shiny paper small butterflies, flowers, hearts, apples.

4. Your food tags are ready. And this is my potatoes salad. Decorated with tomatoes ladybugs and food tag.

We read a book about a little elephant and her mother. The story is very nice and is short. the pictures from the book are beautiful and suggestive.


My daughter liked this book and after I read it for 3 times, and we discuss about this little elephant... we decided to make a ... picture. I think my daughter has been identified herself with this little elephant.
1.You need blue and yellow paper (or you can choose other colors), green paper for grass and red/ pink/ blue paper for flowers, scissors, glue and a black pencil, google eyes.
2.I made two elephants, like in the book: the mother and the child elephant. I cut them and I marked the lines with black pencil.
3.My daughter stick google eyes.
4.I let her to cut and stick some .... "flowers" on the grass. She made some squares, but ... these are pretty flowers !
5.Then we stick with tape and glue the elephants and the grass.
Do you like it? You can try ! It's easy and fun. An in this way your child will always remember the book.


Counting and ABC Chart
In august my daughter will go to kindergarten. She already knows how to count and she knows the letters and to read. Because our old charts were too ... old, we decided to make another one. Here are the steps:
1) I used a big card board (27x 22 inches). I devided squares with sides of 2 inches.
2) I drew the lines with a marker.
3) I wrote the numbers in rows of 10 to be easy to follow how the units and tens are changed.
4) I wrote the letters with different colors and my daughter helped me.
5) She decorated the chart with butterflies, flowers and stars stickers.
She is very proud: because the chart looks great, because we made it and because she has a new and bigger one.


You can watch our movie here: Counting Chart
If you made a chart like this or a different one, send me your photos to post them here.
Corn Ear from Felt
Materials: green and yellow felt, needle and thread, polyfill
Steps:
Cut 2 pieces yellow felt to form the corn.

Sew some little lines horizontal and vertical to form corn as little squares.

Don't stretch the felt. Leave it a little puckered.

Stuff the corn with polyfill. Then sew the edges together.

Cut from green felt 2 leaves. Put the corn cob inside and sew the edges together but untill the half of the cob. Continue to sew the leaves. Sew the leaves and the cob together on the other side.


An Easy Thank You Card
Materials: green card stock 3.50 x 4.00 inches (for card), red card stock (for apples), apple punch, bow

Steps:
1. Punch some red apples and make a pattern (keep the same distance between every punch)

2. Make a bow. Arrange the bow, the apples and the pattern on the card. Switch and move the items to find out a nice look. For example, you can put the apples in a row and the bow on top, in the middle.Do you like it?

3. Or you can put the bow in a corner and the apples on the whole page. Do you like now? Glue the items.

4. Write by hand "Thank you" on a red piece of card stock. You can punch apples to look interesting. Glue the message inside the card.

5. Now it's ready. Find a nice envelope. Or make a nice envelope. (I'll show you how to make an envelope next time).

Tell me if you like it or if you did try. Send me a picture with card to post right here.
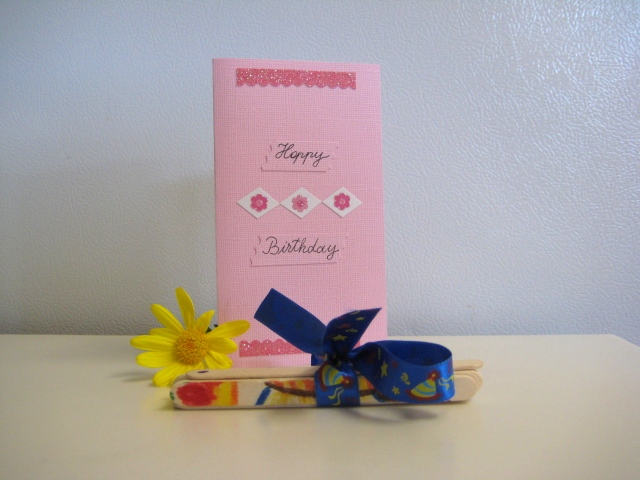
Handmade Puzzle from Popsicle Sticks
It will take you 10 minutes to make a funny puzzle. It can be a toy or a gift.
What you need: popsicle sticks, crayons, a bow
Steps:
1. Put the sticks on the table and mark a little dot on every one.
2. Turn the sticks and draw on them something nice and easy. You can hold them with a hand to get togheter.
3. Ask your kid to help you with something: to draw a funny picture or just to add some items.
4. Tie the sticks with the bow and the gift is ready.


How to make An Easter Egg Ornaments for your door
It takes you 5 minutes to make this simple decoration for your door.
What you need: yellow foam (but you can use any other color), red bow, beads, glue, scissors,and of course ... A DOOR
Steps:
1. fold the foam and draw the half of an egg only on a half on a sheet
2. cut on the line to obtain a perfect egg
3. punch a hole in the top and make a red bow
4. decorate with beads, stickers or other shiny little things
5. stick on the door

How to make ABC flash cards
What you need: magazines with pictures, scissors, glue, white cardboard
Steps:
1. cut from magazines beautiful pictures with fruits, vegetables, people, toys, different things from kitchen, from house, from school


How to play:
1. you and your child can name the pictures
2. find out with what letter begins every word
3. arrange the pictures under the letter which they begin
4. sort the fruits, vegetables, jobs, things
5. say something about the picture - in this way your child will learn to make sentences
6. guess what picture I have - you choose a picture and try to describe it (I have something red; it is a fruit and it is round) and your child will try to guess what it is. Then is his / her turn. In this way, your child will learn to find out the important aspects about a particular thing, such as color, shape, the use.
How to make an Easter card with your kid
What you need: yellow card paper, paper (red, pink, green, blue, purple), glue, craft knife, metal ruler, zigzag scissors.
Steps:
1. make a card from yellow card paper - size 10x12cm
2. cut the "green grass" with serrated scissors and stick it in the bottom of the card
3. draw and cut little egg -shapes from different colors, then stick them in the grass
4. draw and cut a little butterfly and stick it above the eggs
5. That's all !


How to make a Easter Basket with your kid
You and your little one can make a Easter Basket together. We did one, with a chick. You can fill the basket with candy, chocolate eggs or everything else for Easter.
What you need: orange, red, yellow and blue paper, colour foam, ordinary and zigzag scissors, glue, stapler
Steps:
1.cut with zigzag scissors half of the whole orange paper and make a basket; staple it at both ends.
2.cut the bottom in 4 corners, fold the corners inside and staple them
3.with zigzag scissors make a handle and staple to the basket
3.from yellow foam cut a head, put two little blue eyes and a red beak; glue the head in front of the basket
4.cut the tail with zigzag scissors and glue it in the other side of the basket
5. make from orange paper two little wings ans staple to the basket
6.fill the basket with gift paper and chocolate eggs or candies. Or you can fill with spring flowers like in my pictures.
7.That's all !


No comments:
Post a Comment